Creating a wedding band, part 2
Hi! For those of you who didn't see part one of this post, Susan and Jason chose "Stitches" for their wedding bands and I am blogging about the process of carving their bands out of wax, to be cast in 14 karat white gold. This is part two in the process.
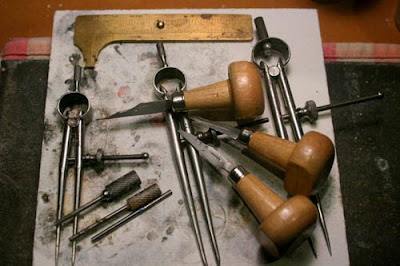
The following two pictures are the tools I will use to carve the details into the wax. I use dividers for marking precise guidelines and gravers for carving the detail. The second photo shows some of the files I use, one specifically for wax and the others are cheap-o's I got at Lowe's. They are a pretty coarse cut that removes a controllable amount of wax but don't clog up with the wax debris.

 The next step is removing some of the wax that I was to chicken to remove with the lathe...live and learn. I measure first to get the initial thickness (with my awesome new digital caliper!) which is 3mm. I would like the thickness to be 2.2mm.
 My next step is to measure and mark the .08 mm I want to remove, which I do with a rotary file. This is an amazing tool, I use it for carving all my waxes and for removing metal when I need to move quickly. It leaves a nice surface that doesn't need much cleanup.

 I was taught to use gravers for the next step. There are lots of ways to carve waxes but this is the way that works best for me. I think graver skills are so important for a bench jeweler or metalsmith to have. While FAR from an expert, my limited skills have helped me out of many jams and have been indispensable when carving pieces from wax. For rounding the outside and creating a comfort fit on the inside, I use, first, a #38 graver and then a #2. The #38 is a skinny flat graver and the #2 has a "V" shape. I use the sharp edge of the #38 to gently scrape wax away, creating a rounded edge, inside and out. I scribe a guide line first with a divider so everything stays nice and even.
 When this step is done, I may run over the whole surface with 400 grit sandpaper but not always. I now have a ring blank that is ready for embellishments (sorry for the blurry pic), which I will cover in my last post, next Wednesday! Thanks for reading!!! See you next week!!!

The following two pictures are the tools I will use to carve the details into the wax. I use dividers for marking precise guidelines and gravers for carving the detail. The second photo shows some of the files I use, one specifically for wax and the others are cheap-o's I got at Lowe's. They are a pretty coarse cut that removes a controllable amount of wax but don't clog up with the wax debris.

 The next step is removing some of the wax that I was to chicken to remove with the lathe...live and learn. I measure first to get the initial thickness (with my awesome new digital caliper!) which is 3mm. I would like the thickness to be 2.2mm.
 My next step is to measure and mark the .08 mm I want to remove, which I do with a rotary file. This is an amazing tool, I use it for carving all my waxes and for removing metal when I need to move quickly. It leaves a nice surface that doesn't need much cleanup.
 I was taught to use gravers for the next step. There are lots of ways to carve waxes but this is the way that works best for me. I think graver skills are so important for a bench jeweler or metalsmith to have. While FAR from an expert, my limited skills have helped me out of many jams and have been indispensable when carving pieces from wax. For rounding the outside and creating a comfort fit on the inside, I use, first, a #38 graver and then a #2. The #38 is a skinny flat graver and the #2 has a "V" shape. I use the sharp edge of the #38 to gently scrape wax away, creating a rounded edge, inside and out. I scribe a guide line first with a divider so everything stays nice and even.
 When this step is done, I may run over the whole surface with 400 grit sandpaper but not always. I now have a ring blank that is ready for embellishments (sorry for the blurry pic), which I will cover in my last post, next Wednesday! Thanks for reading!!! See you next week!!!
.jpg)

Comments
Post a Comment